Table of Contents
Object Detection Workshop
In this workshop we will be scripting a program that uses the YOLOv3 object detection model to detect different objects in a frame. Specifically we will configure the software to detect only people.
What is YOLO
YOLO (you only look once) is a state of the art object detector that is able to recognize 80 different objects in images and videos, but more importantly, it is super fast and accurate for what it is able to handle. We won’t go into the specifics of how YOLO was trained and why it is so effective but you can find more information regarding it on the YOLO website. There is a YOLOv4 that has come out except, it can’t be run on OpenCV.
What is OpenCV
OpenCV is an open source computer vision and machine learning software library. The library provides thousands of optimized algorithms and it is a great tool for real time applications. I gave a workshop last semester going over OpenCV that you can check out here. Its ok if your not too familiar how OpenCV for todays workshop. I’ll be explaining everything throughout the workshop.
Getting Started
During last weeks meeting I mentioned that to participate in the live coding session you had to have everything setup; your python environment, a text editor/IDE, and the necessary files to follow along. If you don’t have this setup you won’t be able to participate in the live coding portion however you can try and quickly set everything up by following the setup instructions.
Let’s go ahead and get started. In our project directory, we will be working in the objectDetectionWorkshop.py file.
Imports
First we need to get all of our imports taken care of. At the top of our file we will see all the required imports:
import numpy as np
import argparse
import imutils
import cv2
Let’s take alook at what these modules actually do:
- NumPy: This module is used for numerical computations in Python. It gives us access to an array object which has a ton of support for different mathematical operations and runs quick
- argparse: This module allows us to parse user command line arguments
- Imutils: This module provides convenient functions for OpenCV as some OpenCV functions can be a bit complicated
- OpenCV: As mentioned above we use this module is used for real-time computer vision applications
Argument Parser
This section we use in order to parse any required arguments
ap = argparse.ArgumentParser()
ap.add_argument("-v", "--video", required=True, help="path to input video")
args = vars(ap.parse_args())
Here we create an instance of the ArgumentParser object. We then add a required argument which requires the user to specify the path to a video feed that they would want our software to operate on. Lastly we grab all the arguments and store them inside our args variables as vars which stores objects inside a dictionary object.
Loading in the Model
Now we have to load in the YOLO model. First, we’ll load in the YOLO model:
net = cv2.dnn.readNetFromDarknet("models/yolov3.cfg", "models/yolov3.weights")
To load in the model we used OpenCV’s DNN function. This function is able to interepret YOLO’s weights and configuration. In Layman’s terms, this loads in the YOLO object detection model
We also have to load in the class names for YOLO. As I had mentioned, yolo is able to detect up to up to 80 different objects. We want to get these object names in order to reference them later when we only detect for people.
ln = net.getLayerNames()
ln = [ln[i[0] - 1] for i in net.getUnconnectedOutLayers()]
Here we get the unconnected layers from the model. To understand this concept you need to understand the structure of a Neural Network. If you don’t understand the structure of a Neural Network its ok, we are just getting the proper output layers so when we run our model we can get the results later.
I also included, by accident, a way of seeing all the different labels that YOLO has:
LABELS = open("models/coco.names").read().strip().split("\n")
Here we use a file that already has the names of the output layer. We won’t be using this implementation, but just know it is an alternative
Capturing Video
Lastly, before we get started detecting objects in frame, we need to use OpenCV in order to process every frame in the video. We do that by creating a VideoCapture object in OpenCV:
cap = cv2.VideoCapture(args["video"])
This allows us to process the video. Here we pass in the video argument we require using the argparser library we previously implemented. We did this because it allows us to quickly change the video we want to process without directly changing the code.
Processing Every Frame
The way in which we detect objects on a video is by running YOLO on every frame and visually diplaying our results. In this section we will be working inside an infinite while loop. This will allow us to go frame by frame running our results.
As you can imagine this is computationally expensive. Running a model on every frame eats up a lot of memory. In this situation since we are processing our results using our CPU, it gets pretty expensive quick. There are more advanced methods to help with processing our results faster and getting a quick runtime speed but for the simplicity of this workshop, we will be keeping it like this
Reading a Frame
Using the VideoCapture object we created, we’ll extract the first frame:
_, frame = cap.read()
Since cap.read() returns two values, we store the first value inside the underscore variable and the second inside the frame variable. We’ll only be using the frame variable which is why we gave the other variable the name underscore. The frame variable holds an individual frame from a video.
Now we also want to extract data from the frame for future use:
HEIGHT, WIDTH, CHANNEL = frame.shape
This just gives us some useful information from the frame like the width and height.
Displaying our frames
I tend to put this section at the bottom of the while loop, however I always include it first so we can see what we’re working with.
cv2.imshow("frame", frame)

if cv2.waitKey(1) & 0xFF == ord('q'):
    break
Here the function imshow() displays our frame in its own window. We give the frame a name and then we give the information needed to print the frame. Here we also specify an early quit statement. Here we are checking to see if the user presses “q” while in frame, the video will exit.
Detecting Objects
Now we can finally get into the object detection portion. We’ll use our YOLO model to extract information from the frame and determine what has been detected
blob = cv2.dnn.blobFromImage(frame, 1 / 255.0, (416, 416), swapRB=True, crop=False)
net.setInput(blob)
layerOutputs = net.forward(ln)
First we create a blob object through OpenCV. Typically when you want to run a model, you preprocess your data so it matches what the model is looking for. In this case the blobFromImage function performs mean subtraction and scales the image. Here’s an example of mean subtraction:
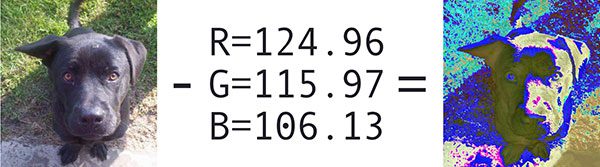
If you’re really interested in what happens behind the scenes of this function check out PyImageSearch’s blog post.
Now we pass in that blob information by setting it as an input and then having the model and saving our results to the layerOutputs variable
Storing results
For the next portion, we’ll want to store our results so when we print our results, we’ll have that information handy
boxes = []
confidences = []
classIDs = []
Here we declare lists where we’ll store information:
- boxes: Here we will store the bounding boxes coordinates for each person
- confidences: This will give us the confidence level of the model when it makes a prediction
- classIDs: This will tell us the class type of each object detected. We’ll only be using the people class types
Iterating Through the Detections
Now that the model made its detections, we’ll want to go through them all and gather the results:
for output in layerOutputs:
    for detection in output:
Here we first iterate through every layerOutput. YOLO is structured a bit weird but there are 3 different layer outputs and each is responsible for detecting different groups of objects so we want to iterate through them all to find our results. We also iterate through every detection in the output so we can get every single detected object.
Inside the nest for loop, we want to extract relevant data from each detection
scores = detection[5:]
classID = np.argmax(scores)
confidence = scores[classID]
In this instance, scores gives us the probability of each of the 80 classes. It is a list with 80 different floats that give the probability of a detected object. Using this information, we take the highest probability and assign it as the detected object. We then grab that score and assign it to the confidence
Grabbing the Box Locations
Now that we have the detections, in that same nest loop, we want to grab the locations of where the people are:
if confidence > 0.5 and classID == 0:
    box = detection[0:4] * np.array([WIDTH, HEIGHT, WIDTH, HEIGHT])
    centerX, centerY, w, h = box.astype("int")

    x = int(centerX - (w / 2))
    y = int(centerY - (h / 2))
Here we have an if statement that will only execute if the model is at least 50% confident about its detection and if its classID = 0. The classID is the type of object is it. If you look in the models/coco.names file you can see all the classes in order. The first class, 0th index, is labeled person. So here we are only drawing our detections for people.
Now when we’re inside the if condition, we want to get the location of the people relative to the frame. Our model detected objects relative to the frames position after it was preprocessed. We want to convert those results by multiplying those values with the height and width of the frame to properly convert and accurately locate the object. We then take these converted values and assign them to 4 different variables.
Lastly, we want the x and y coordinates of the top left corner. We want these values because when we draw the rectangle around each distinct person, we have to specify opposite diagonal corners. This conversion will allow us to do that.
boxes.append([x, y, int(w), int(h)])
confidences.append(float(confidence))
classIDs.append(classID)
All we do now is store this gathered information in a list and this process will be repeated for every detected object
Non-maxima suppresion
YOLO does not apply non-maxima suppression for us. Non-maxima suppresion helps to suppress overlapping bounding boxes.
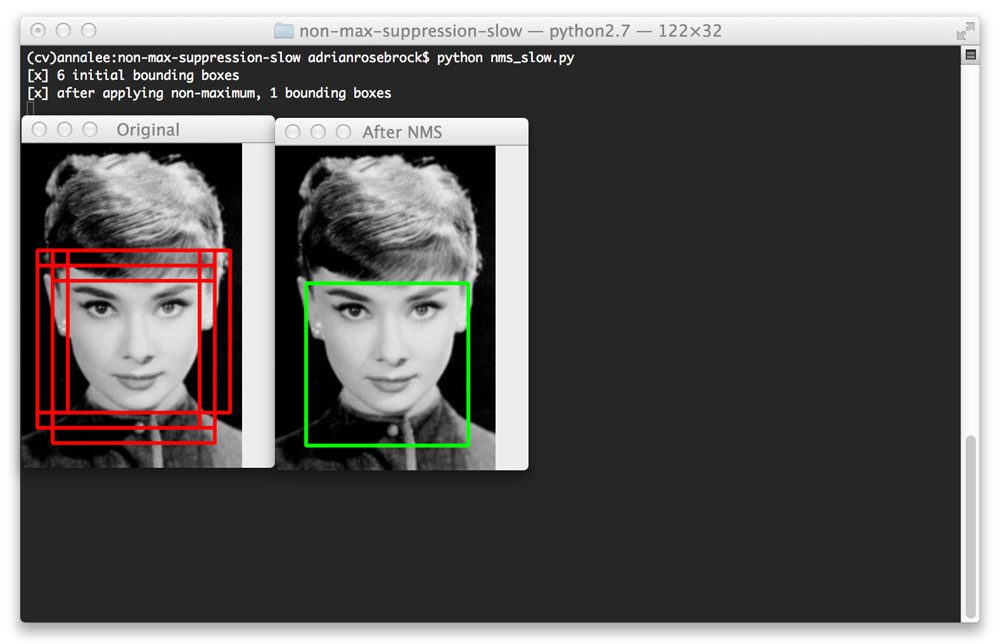
For more information on this process check out this blog post on NMS
Now, let’s actually apply the NMS to our detections:
index = cv2.dnn.NMSBoxes(boxes, confidences, 0.5, 0.3)
Here we simply just used the NMSBoxes function from OpenCV. For our arguments, we just specified the bounding boxes, their associated confidences, a confidence threshold, and a NMS threshold.
Printing out results
Now for the final part of the code we can take our obtained data and print it out on every frame in order to show our detections.
Rectangle Function
Now we can take our results and display them. We first have an if statement to check if there are even any detections. Afterwards we run all of our detections in a for loop
if len(index) > 0:
    for i in index.flatten(): #Flatten to convert results from 2D array to 1D array
        (x, y) = (boxes[i][0], boxes[i][1])
        (w, h) = (boxes[i][2], boxes[i][3])

    cv2.rectangle(frame, (x, y), (x + w, y + h), (0, 255, 0), 2)
Then we extract the different coordinates and use the rectangle function to draw our results
Closing Files
Lastly we want to close any files, windows, and captures that we opened using the imshow() function and the VideoCapture object:
cap.release()
cv2.destroyAllWindows()
Wrapping Up
And thats the entire project. A super simple implementation of the YOLO object detector using OpenCV. Hopefully you learned something new this week!